

How To Copy And Paste Color Settings In Premiere
Adobe Premiere Pro CC 2022
Premiere Pro is a popular video editing software past Adobe that works on both Windows and on Apple computers. It is comparable to Apple tree's Concluding Cut Pro video editing program, simply has become the program of choice for many video producers.
Premiere Pro is a non-destructive editing software, which ways nothing yous do in the program can change or overwrite your media files. That said it'due south always good to go along a fill-in of your project and media files. Premier Pro is taught in three of our workshops. For a hands-on video editing feel join Premiere Pro for Intermediate Video Editors or Advanced Video Editing.
Creating a New Projection
Each video you create in Premiere should get-go past creating a new project.
The project file will save all your edits and changes you've made. It'due south saved as a split up .prproj file that tin can be opened only with Premiere Pro.
The projection file will comprise references to the different media files you use to build your movie and the sequences on which you suit your video clips, add audio tracks, transitions, titles, etc.
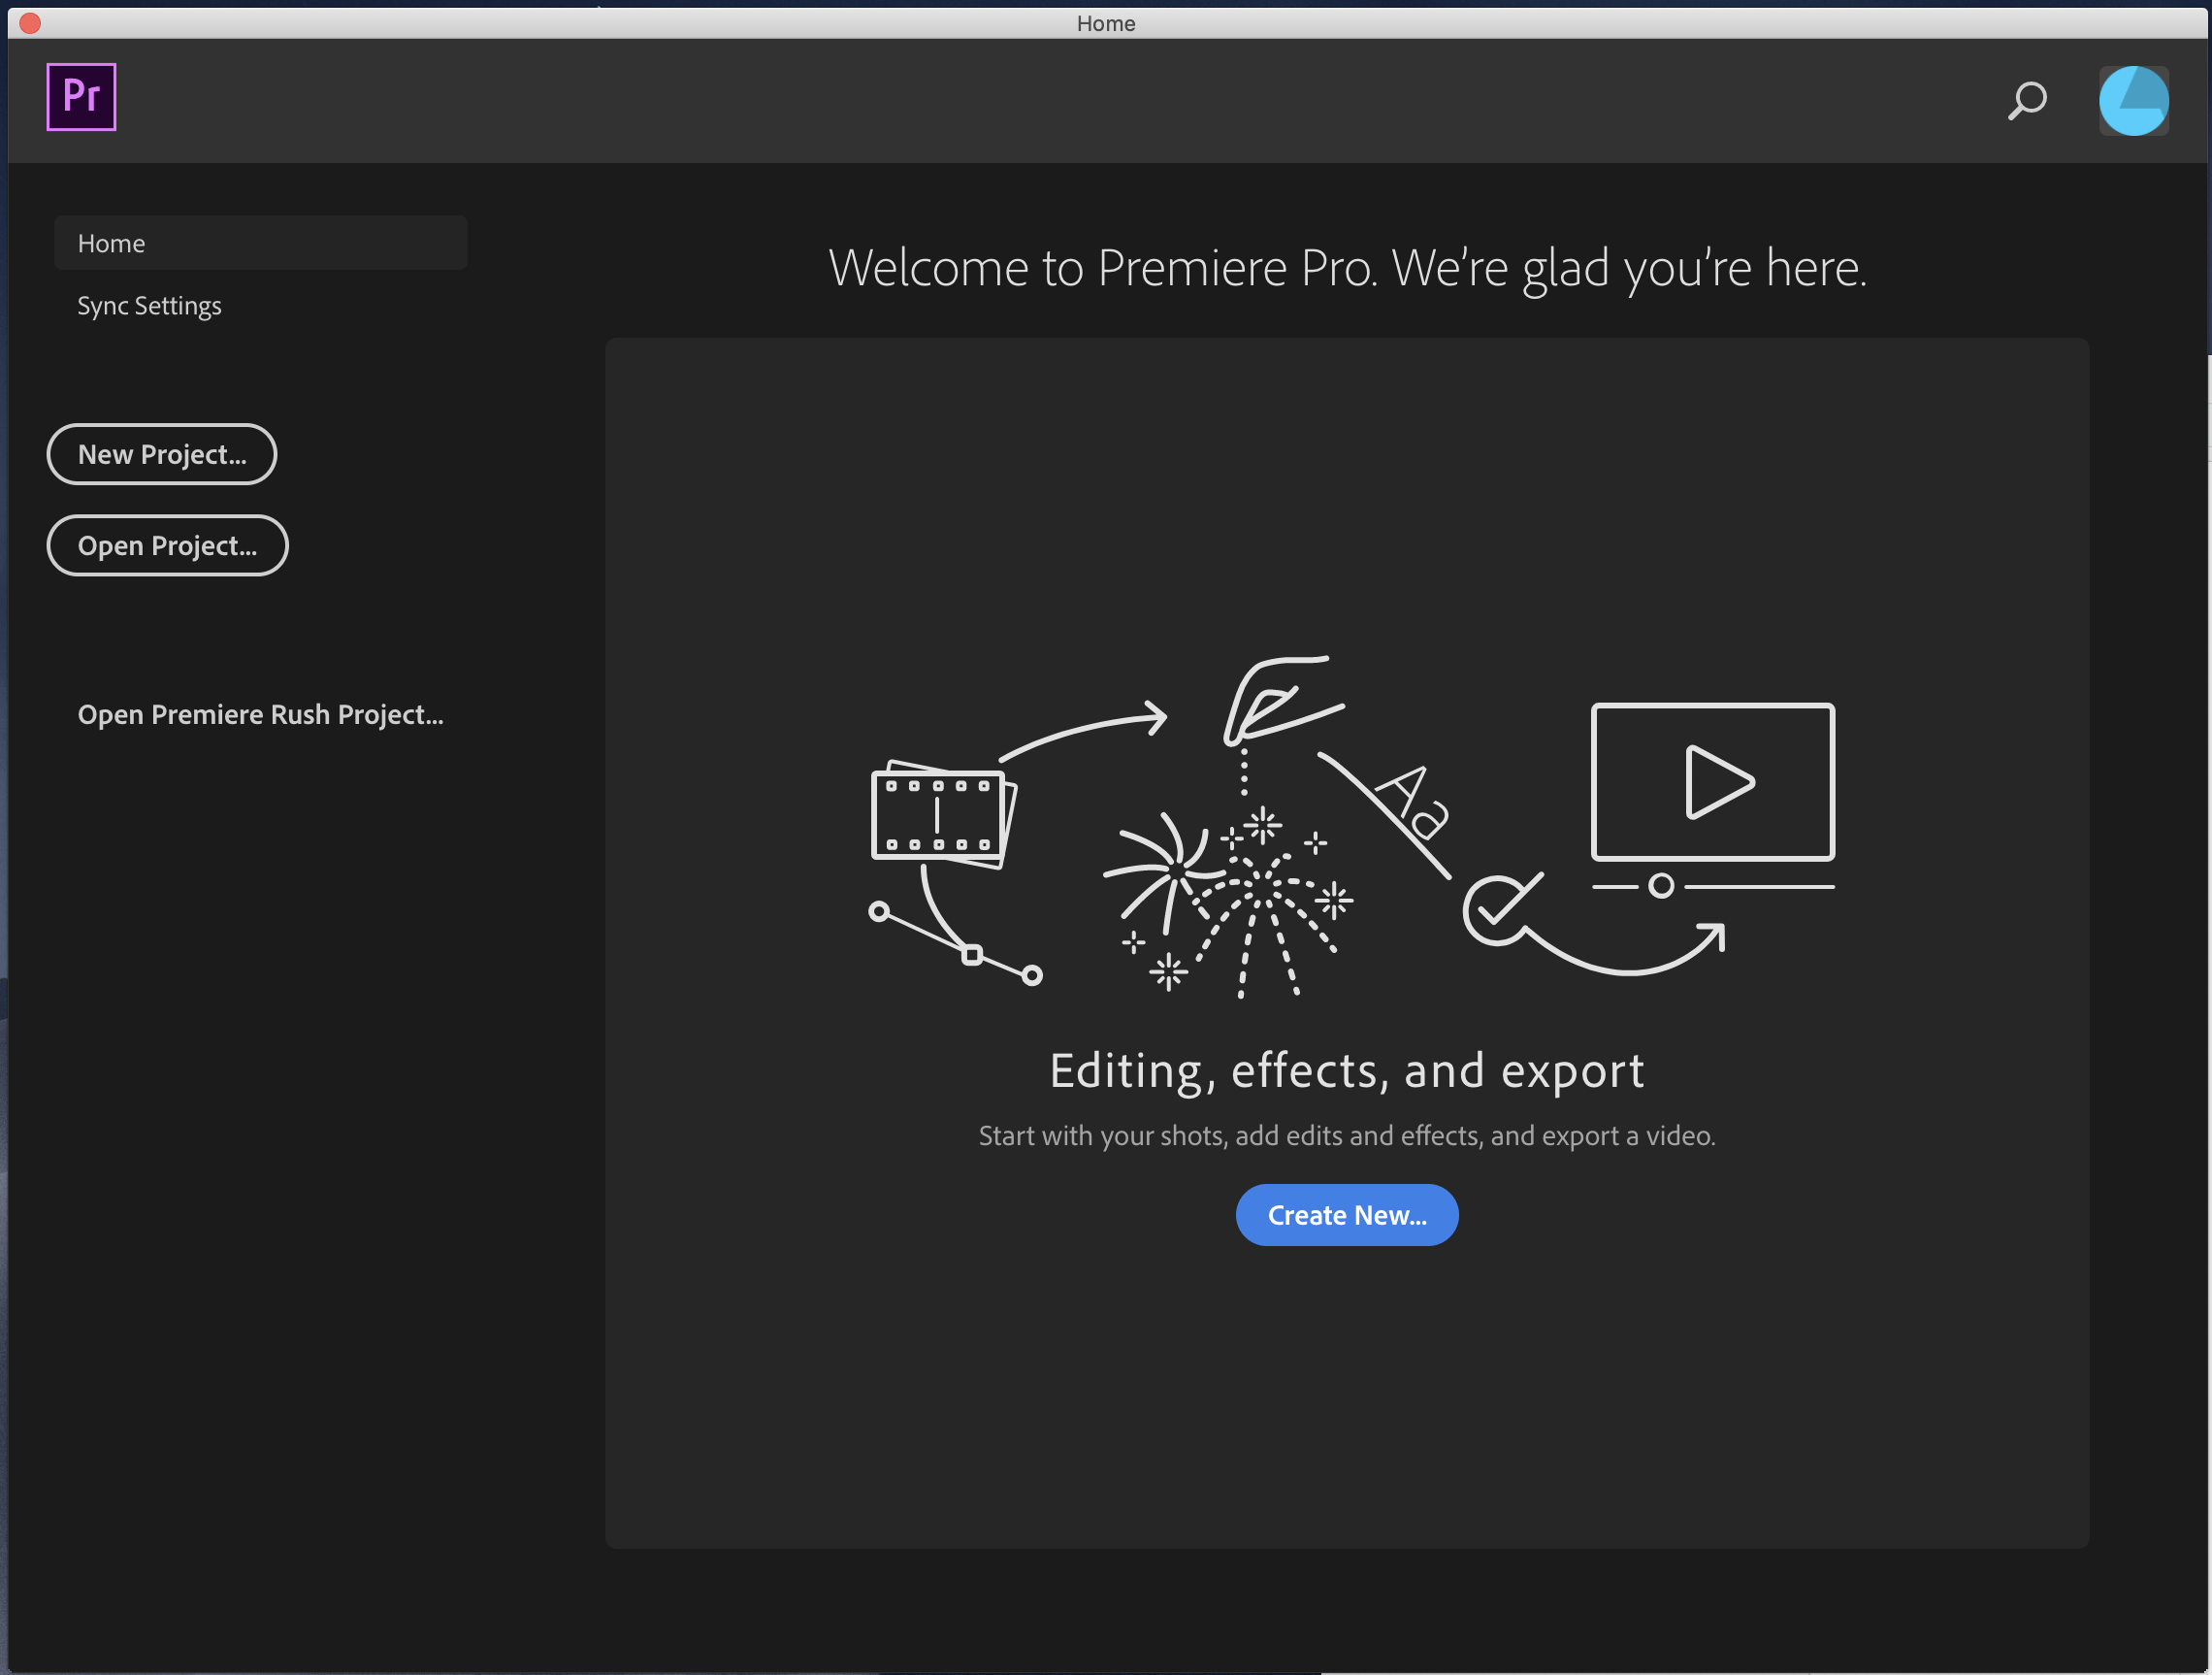
When you launch Adobe Premiere Pro, a new window will appear. Click the New Project button, located on the left side of the window.
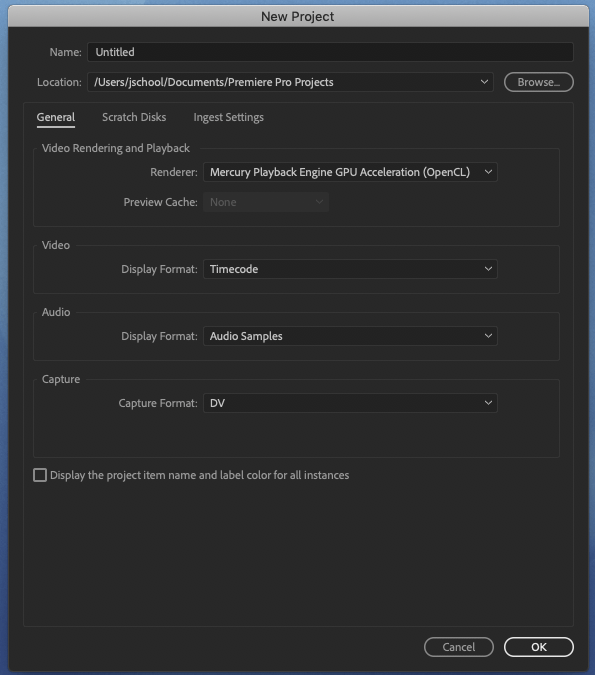
This volition open a new window where you tin ascertain the basic settings of your projection, including the filename and location where the projection file will be saved.
In the New Projection dialog box, Proper noun is what yous'll call the projection file, and Location is where the project will be created.
When working in Premiere, it'south best to keep both your footage and project file together on an external hard drive. And so on your external difficult drive, make a new folder for your project, and use Browse to save your project file in that new folder.
You shouldn't need to alter any of the other settings on this page, but earlier you click OK , y'all should cheque the Scratch Disk settings.
Setting the Scratch Disks
Click on the Scratch Disks tab at the top of the New Projection dialog box.
The scratch disk is the location on your calculator where Premiere Pro CC 2022 will shop media and other files related to your project.
Past default the Scratch Deejay will exist set to the aforementioned binder that you fix as the location for your new projection. We recommend setting it to the same location, unless you have multiple difficult drives.
IF YOU ARE WORKING ON A Estimator WITH iii OR More than HARD DRIVES then you lot tin can improve functioning by setting "video previews" and "audio previews" to that third bulldoze. If you simply accept 1 or 2 drives (your figurer, and an external hard drive), y'all tin ignore this, but for the curious, the ideal disk setup according to Adobe is equally follows.

Later on scratch disks, you can check out the Ingest Settings. We won't change whatever of these settings right now, but we'll come dorsum to them later when we start importing our media files. All of these settings can exist changed after y'all've started your project also, if needed.
Later verifying the ingest settings, click OK .
Editing Workspace
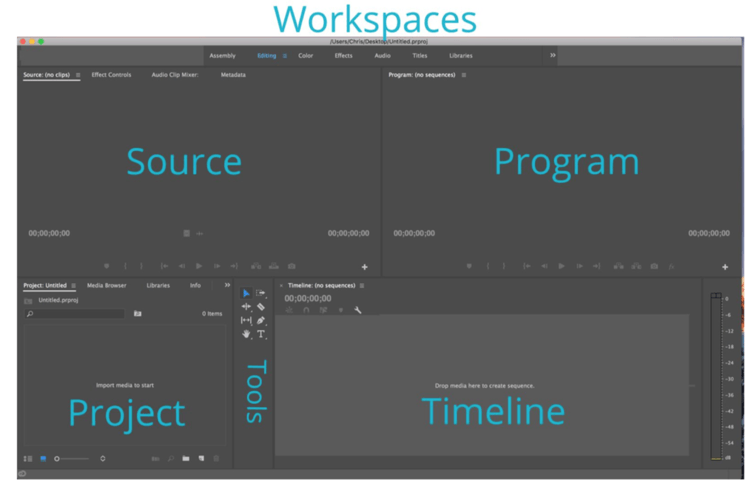
After you create a new project or re-open an existing project, the primary workspace for Adobe Premiere will open on your screen. It is divided into 4 sections or panes:
- Workspaces – This bar at the top shows the different workspaces bachelor in Premiere. A workspace is simply a preset for how the different panes are arranged. By default, Premiere should open in the Editing workspace. This is the workspace we will be focusing on. If you ever accidentally close or can't discover a window, right click the three horizontal lines next to Editing in the top bar, and click Reset to Saved Layout.
- Project – This shows the media files you take imported into your project, likewise as your sequences. Within this window, there are as well a number of tabs y'all tin can navigate through to admission your media more easily. Two of the main tabs nosotros will exist using are Media Browser, and Effects. Media Browser shows files on your figurer or external difficult drive that you can import into Premiere. Effects contains different filters and transitions you can employ when editing your video.
- Source – The Source pane is used to preview video clips selected from the project window. Double click a video file from the Project pane to view it in the Source pane. You can elevate and drop video files from the Source or Project pane into the Timeline to begin editing. I of the chief tabs inside the Source pane is Outcome Controls, where y'all can arrange effects y'all've added to your source video.
- Timeline – This is where you assemble your clips in a sequence, along with transitions, text boxes, audio tracks, etc. Until you create a sequence, this section volition exist blank. The default position is the lower right of the screen.
- Programme – This pane is where you lot tin can see a preview of the sequence you have open in the Timeline. This is the preview of your edit in progress.
To modify the layout of your workspace panes, click the Window push in the vertical bar at the top of the screen. 'Workspaces' should be the first option in the menu. Hover over it to display the available pre-selected workspace panes, and select whichever y'all prefer. We recommend using the Editing layout.
Any panel can be resized by clicking and dragging at the margins between panes, or moved effectually the screen by clicking and dragging on the name of the pane.
Preferences
You lot can change a number of setting preferences in Premiere, such equally doing more frequent automatic saves of your project or changing the default settings for how audio from your camera is converted into different types of sound tracks in Premiere.
To change the preferences on a Mac, in the horizontal menu at the top select Premiere Pro > Preferences and select the setting you lot want to modify.
On a PC, the aforementioned carte du jour is available from Edit > Preferences
Machine Salve
We recommend adjusting your Auto Salve preferences to Automatically Salvage Every 5 minutes.
To exercise this, select Premiere Pro from the horizontal bill of fare at the top of the screen. Hover over Preferences , and click Auto Save from the driblet-down carte.
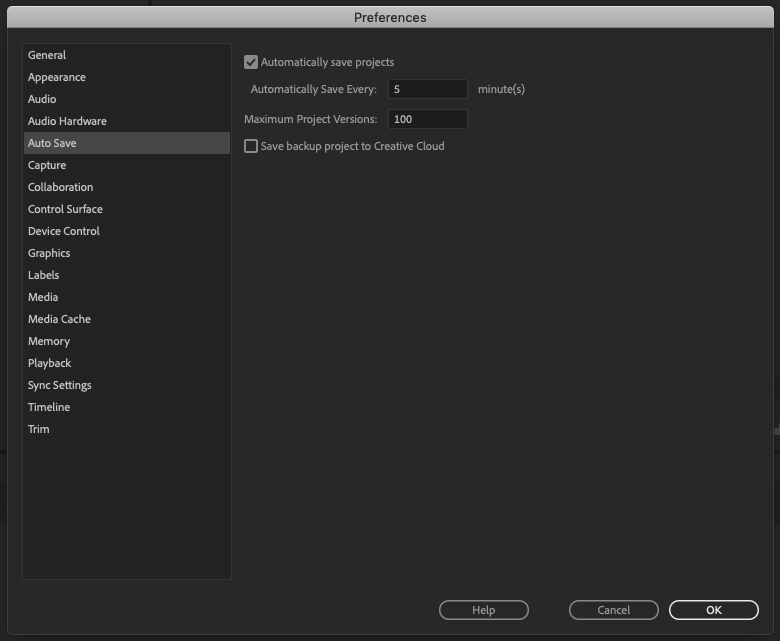
Make sure yous take selected the checkbox next to Automatically save projects .
In the text field next to Automatically Relieve Every: enter 5 minutes.
In the text field next to Maximum Project Versions: enter 100.
This will automatically save your project more frequently, and keep a longer record of onetime versions of your projection.
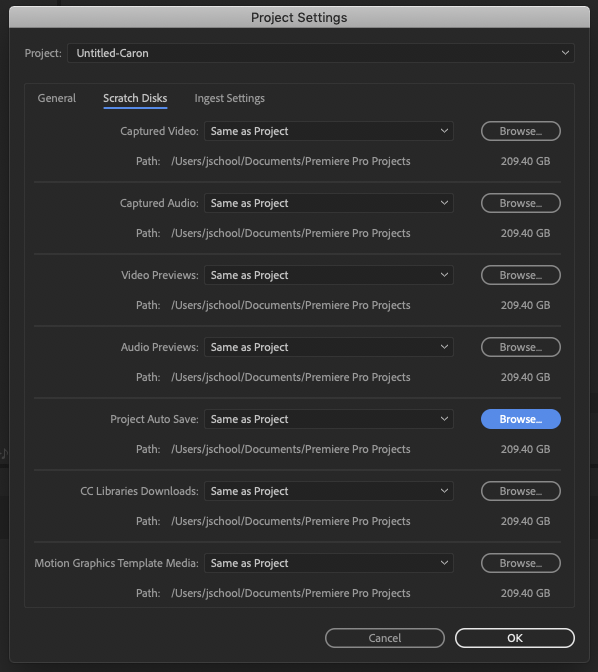
Yous tin can choose where Premiere Pro CC 2022 will store your auto saved files by setting your Scratch Disks. Hover over File in the horizontal menu at the superlative of the screen, go to Project Settings and click Scratch Disks . A new window called Projection Settings will appear. Nether Project Auto Salvage , you can choose where the car saved files will be stored.
Copying Video Camera Files
Before we edit video you've shot, we need to re-create information technology from your camera's retentivity card to the figurer or external hard bulldoze.
The easiest way to do this is to connect your retentiveness bill of fare to your computer using a carte reader, and drag and drop the contents into a folder that volition contain both your project file and video files onto the computer or external hard drive.
Of import annotation : It's all-time to drag the entire contents of the carte onto your computer. DSLR cameras like Canon and Nikon may accept individual .mp4 files that y'all tin can copy one by one, just for many cameras, particularly from Panasonic and Sony y'all need to drag the entire folder on the carte du jour. This folder is probably called "Private" and will comprise another folder chosen AVCHD or XAVC the video files. It's important to continue these folders together because they also comprise related files such equally metadata files that Premiere will need to open the videos. You should not edit the AVCHD binder or any files inside this binder, or you gamble corrupting the video footage.

Copying your footage to your computer or external hard bulldoze will make the video files attainable to Premiere for import via the Media Browser, and allow you lot eject the memory card without breaking Premiere's connectedness to the video files.
Importing
Information technology is necessary to import your media into Premiere so you can begin editing.
Click File > Import from the horizontal menu at the top of the screen. A finder window will open, and you can select the folder or private files you lot want to import.
 You can likewise employ the Media Browser pane in the lower left side of the editing workspace to navigate your computer and select media to import. The Media Browser functions similarly to Finder or Explorer, merely is built into Premiere. You tin can view the files that are available on your computer or external hard drive and import them into Premiere.
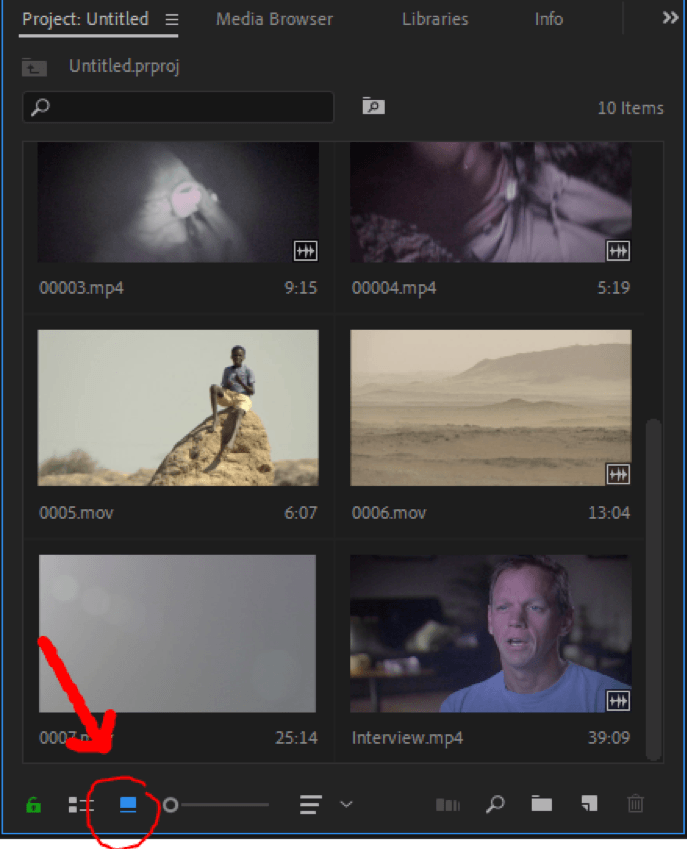
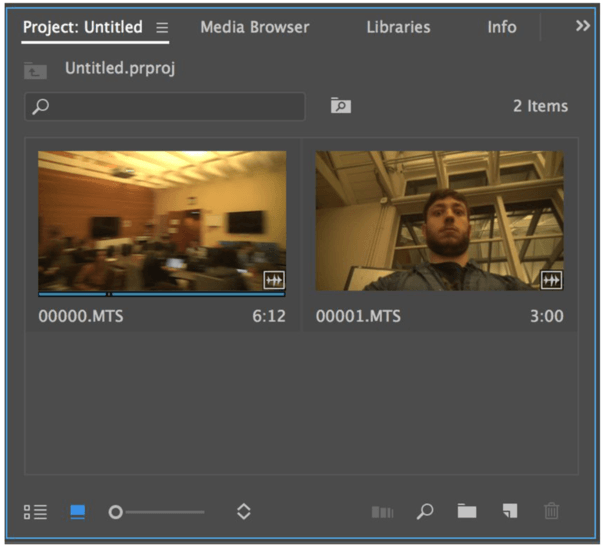
Y'all'll encounter the file directory for your hard drive displayed on the left. Navigate to the folder that has a file you want to use in your flick, and yous'll run across the file displayed on the right. Video files will appear as icons showing the first scene from the clip.
Make sure you lot click the icon view button at the bottom of the Media Browser to display your video and photos every bit icons. You can also adjust the slider at the bottom to increase the size of the icons, and click on the iii horizontal lines to sort by proper name, filetype, etc.
 You can preview a prune to make certain it'southward one you want to import by selecting the prune and using the small scrubber bar to scan through the clip.
Press the tilde fundamental ( ~ ) on the keyboard while the Media Browser is selected to view this project pane in fullscreen view. This, in conjunction with zooming on thumbnail view, offers an easy way to scrub through your videos and preview your clips.
Double click on a file to preview information technology in the Source pane, located direct above the Projection pane. This does not import the file, but allows y'all to play the clip, and scrub through it in a larger view.
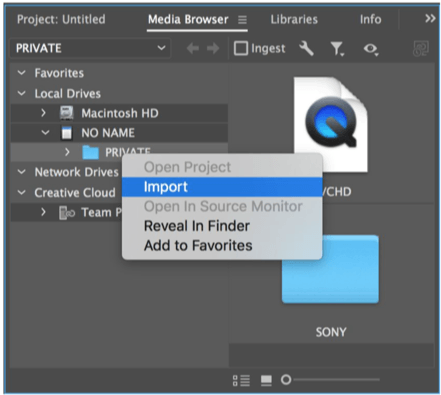
To import a file, correct-click on a file and select Import from the drop-down menu. Premiere Pro CC 2022 will import the file and it will appear in the Project pane.
Ingesting
You tin also re-create files from a media carte to your figurer and import them into Premiere in one action using the Media Browser. This will copy media from your carte du jour to your computer, and import all at once. Adobe Media Encoder must be installed to import files this fashion.
To first, in the peak bar of the Media Browser, select the checkbox labeled Ingest .
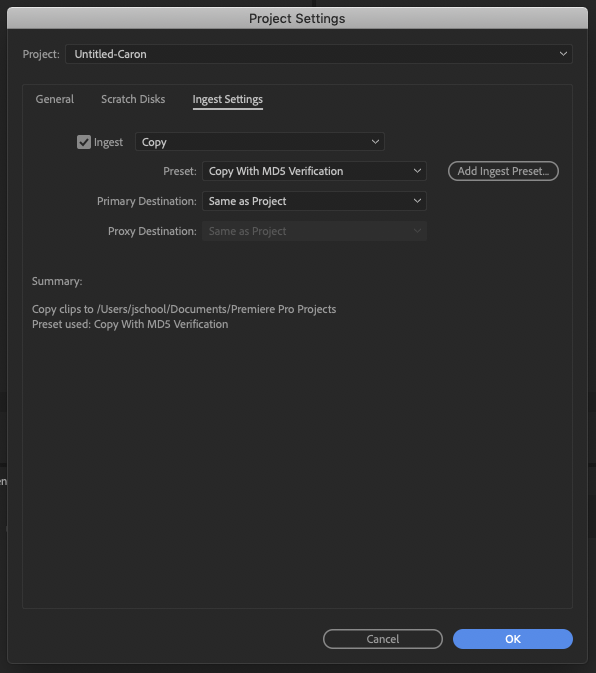
And so click the wrench next to the Ingest checkbox to verify your settings. The Project Settings window volition open to the tab chosen Ingest Settings.

Re-create : means that a copy of the files will exist made.
Preset: MD5 verification is a fancy way of maxim Premiere will double check to make sure everything copied without errors.
Primary Destination: Defines the location where the files will be copied. By default, the files will be placed in the aforementioned folder as your project file.
Click OK to salvage your settings.
Navigate to locate your card using the Media Browser tab. Your media card should be under Local Drives. You can toggle the arrow to find the specific card you want to import files from. Right click on the file or folder y'all wish to import, and select Import from the menu options. The media files will be copied from the card to your project file, and imported into your project.
Some other programme called Adobe Media Encoder volition open and show you a progress bar every bit the files are beingness copied, simply you can ignore this and commencement editing immediately.

Undoing changes
If you lot brand a error while editing your video you can utilise Premiere'due south Undo function to return to earlier versions of your projection.
There are multiple ways to employ the Undo function. Navigate to the horizontal menu bar at the top of the page, right click Edit and select Undo from the carte du jour.
Alternatively, if you are using a Mac, you can use a keyboard shortcut and simultaneously press Command + Z . If y'all are using a PC, press CTRL + Z .
Previewing Your Clips
In lodge to edit the footage you lot imported, navigate out of the Media Browser, to the Project tab in the Project pane.
Double cheque that you are working in the Project pane and not the Media Browser. Clips in either window can be previewed in similar ways (similar scrubbing through the footage), but it's only the Project pane that shows yous the imported media that'south ready to edit.
You can change how you view your footage- in a list or as icons you can scrub through -by selecting betwixt ii buttons in the bottom left of the Project pane. You lot tin view clips in the Source pane for a larger preview. Double click on a clip, or click and drag it onto the source monitor to preview.
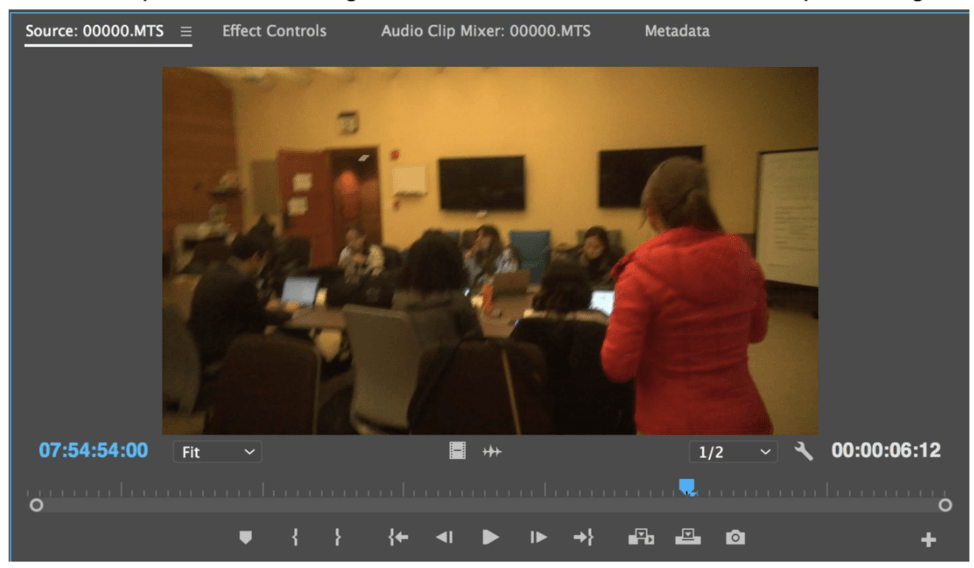
Once a prune has been loaded in the Source pane, y'all can use the buttons on the lesser, or the infinite bar on your keyboard to playback or pause the video. The bluish pointer is called the Playhead , and shows your position in the video. You lot can drag it left or right to scrub forrard or backward in the clip.
You can control playback with the keys J , K and Fifty . J will rewind, Chiliad will suspension, and L will play the clip forward. Clicking J or L multiple times will speed up playback forwards or backwards.
Creating a Sequence
Before you lot start editing, you need to create a sequence. A sequence is a container for all of your edits. Sequences are organized and accessed in the Projection pane and edited in the Timeline. You lot can take multiple sequences in 1 projection, or do all of your editing inside i sequence, it just depends on how you piece of work.
To create a new sequence, navigate to the horizontal carte du jour at the peak of the screen. Click File > New > Sequence . Alternatively, y'all can use the shortcut Command + N on a Mac, or CTRL + N on a PC.
Once you've created the sequence, a New Sequence window will open up. Here, you can choose settings for your projection's sequence, which will be applied to the video you are creating.
You tin change settings hither to friction match the video format for the photographic camera y'all used for this projection. You and then can salve the changes as a custom setting to reuse later on (this is helpful if you're repeatedly using the aforementioned video camera). For instance, the main video camera we use at Berkeley AMI is the Sony X70.
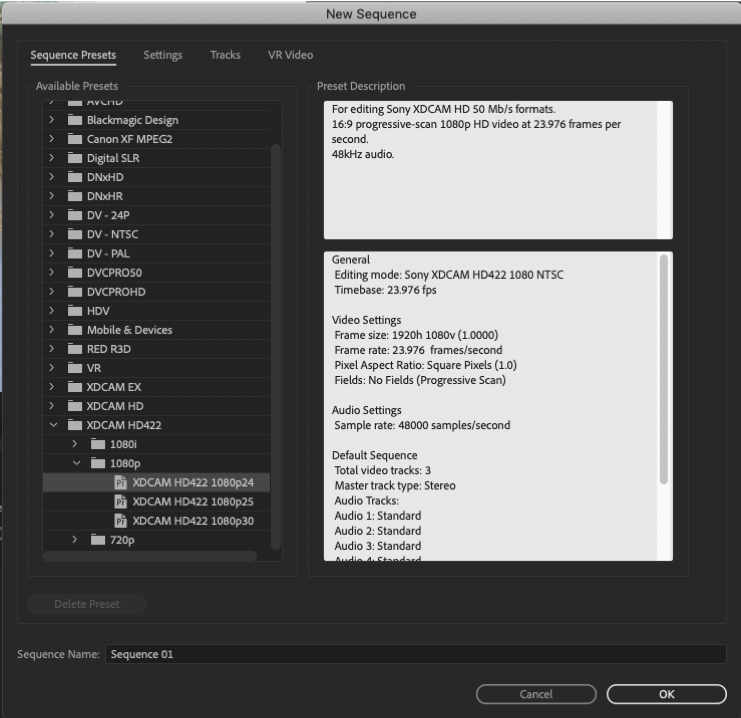
In the Sequence Presets tab, navigate to the XDCAMHD 422 folder, under Available Presets. Within this folder, open the 1080p folder, and select XDCAM HD422 1080p24 . This setting matches the resolution and frame rate we use with the Sony x70 camera.
If yous are shooting on a Nikon or Canon, you'll want to use the Digital SLR setting.
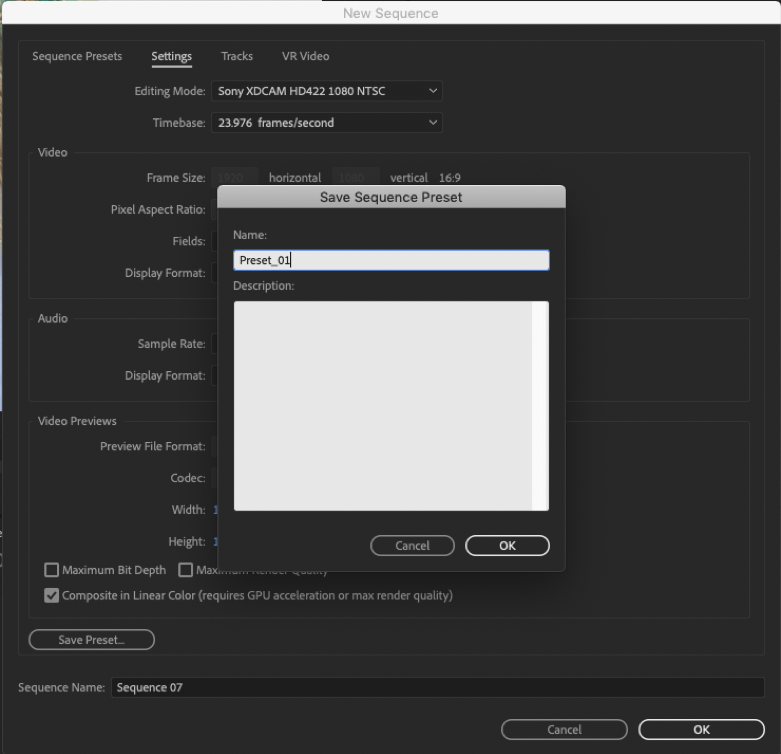
To create custom settings, open up the Settings tab, located to the right of the Sequence Presets tab. Click the Save Preset push button in the bottom left of the window. A new window volition open, prompting you to name your preset. Proper name the preset and click OK . Your preset will exist available in the Sequence Presets tab, within the Custom folder at the bottom of the listing of Available Presets.
You tin can use your custom preset for futurity projects where you are editing video from the aforementioned camera.
If you're unsure of the video settings on your camera, Premiere tin can automatically friction match the sequence settings for y'all. Premiere Pro CC 2022 will do this automatically when you elevate a video clip from your Project pane into the Timeline.
Later on, when you lot elevate and drop a clip into the Timeline, a dialog box volition appear request if you desire to Change sequence to lucifer the clip'due south settings . To practice so, select Change sequence settings , and the settings will be adjusted to match those of your video clip.
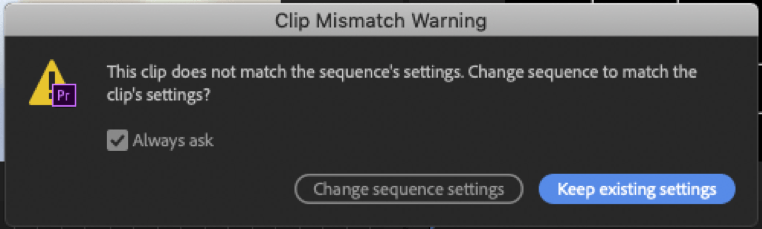
Annotation: If you copy and paste a clip into the Timeline, you may not get this alarm. It may simply announced after y'all elevate a clip into the Timeline from the projection window or source monitor.
Moving Clips to the Timeline
You tin can add together a clip to a sequence in the Timeline past dragging it from Source pane on the top left of the screen, downwards to the Timeline pane on the lower correct. Alternatively, you can elevate and driblet video footage from the Projection pane directly into the timeline.
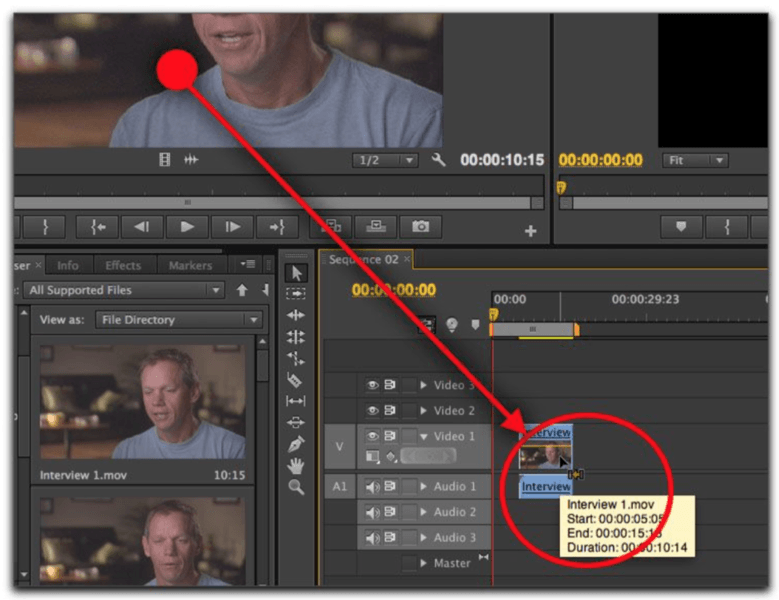
Drag the prune to the V1 video track on the timeline and release.

If there is audio with the clip yous're moving to the timeline, that volition automatically be added as one or two new tracks of audio located on A1 and A2 below the video runway.
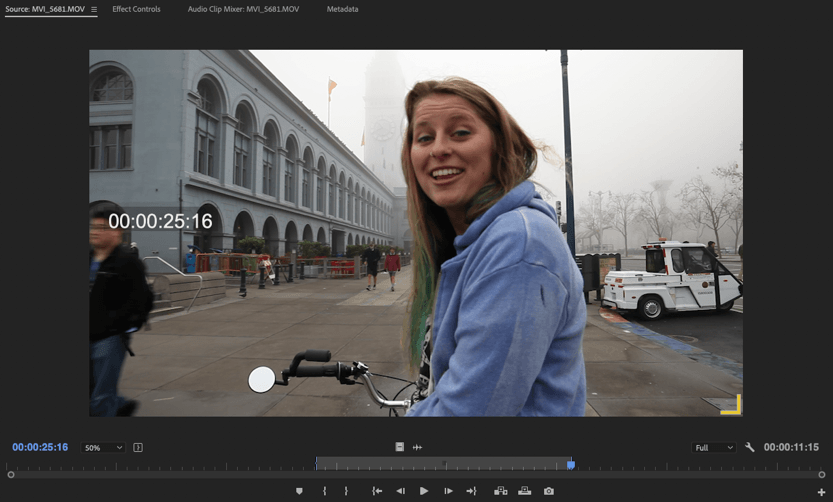
If necessary, you lot tin elevate only the audio portion of a clip to the timeline. Drag the icon that looks similar an audio waveform, which appears simply beneath the preview on the Source pane, to the audio tracks in the timeline.

You lot can also drag but the video portion (without audio) to the timeline. Take hold of the icons just below the preview on the Source pane that appears like a motion-picture show strip, and drag it to the video track of the timeline.
You can likewise highlight a portion of the video every bit you preview information technology in the Source pane, to drag a selection into the timeline, rather than an entire video prune.
Click where you would like to begin the pick using the blue playhead. Choose the selection using the open bracket tool {, or clicking I on your keyboard. Scrub forward in your video preview to your called endpoint and click the airtight bracket tool }, or press O on your keyboard. The expanse y'all take selected will be highlighted in the Source pane. Elevate and drop the option into the Timeline pane to edit.
Working with the Timeline
The timeline is where you lot will practice your editing and build your final video.
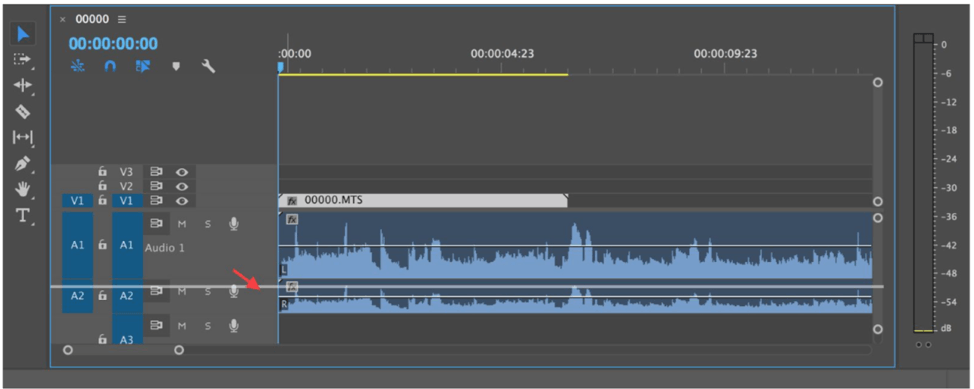
Video clips announced as horizontal bars in the timeline. Those in the upper half (Lines marked V1, V2, V3 etc.) are video content. Those in the lower half (A1, A2, A3 etc) are audio content.

The thin vertical blue line is the playhead, and it shows your position in the timeline. When the playhead is over a video clip, the video will appear in the program pane above. If yous accept multiple tracks or clips in the timeline, the playhead will view them from the top-down. For example, i video track will cover another. Recall of all your tracks as if they're stacked up, and the playhead is viewing them from higher up.
You can simply view the height video prune in the Programme pane.
Yous can move the playhead past dragging it right or left, or yous can printing the spacebar on your keyboard and utilise the keys J,K, and Fifty to navigate. They play backwards, intermission, and forward, respectively.
Yous can as well zoom in or out in time on the timeline using the + and – keys, or by clicking and dragging the circles on the horizontal bar under the timeline from left to right. Zooming in and out on the clip allows yous to view the seconds or minutes more closely, and edit your footage more than precisely.
Zoomed Out:
Zoomed In: This is the same clip every bit above, just we're seeing merely a few seconds of it below.
Editing Clips in the Timeline
Y'all can movement video clips around in the timeline by clicking and dragging them upward, down, left or right.
You can shorten clips past clicking on the edge of a prune and dragging it in. When you hover your cursor over the clip, a cherry arrow will announced. Click and elevate in to shorten the prune to the desired length.
You can also lengthen a prune by clicking on the border and dragging information technology out to the right.
If you accept a prune with both video and audio tracks, and you want to change one track without affecting the other (such as deleting the audio track), you lot can unlink them.

To split audio from video, click the Linked Option button, which has an image of a mouse cursor over 2 confined. When the button is highlighted blueish, your sound and video are linked inside the clip, when it's white, the selection is unlinked. Alternatively, y'all tin can correct click on the clip and select Unlink in the drop-downwards bill of fare. You now can move the video and audio track clips independently of each other.
Past holding Selection or Alt , you can also brand whatsoever of your edits only target the prune yous're clicking on. For example, holding Alt will permit you click and only select one audio track from a linked pair.
Past default, the Timeline is set so that side by side clips "snap" to each other, which makes it like shooting fish in a barrel to align them without having one clip accidentally overlap the other or leaving empty space between clips.
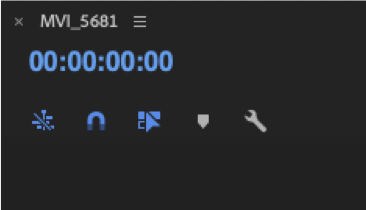
If needed, you can plow off snapping by clicking on the Snap icon, which is in the top left of the Timeline, to a higher place the labels for the video tracks. The Snap icon looks like a U-shaped magnet, and should be highlighted blueish if information technology is on, and white when it is turned off. If you lot pass your mouse cursor over the icon the give-and-take Snap will appear. Yous can also click S on your keyboard to turn it on and off.
If you want to delete a prune on the Timeline, select the desired clip and press Delete on your keyboard.
Razor Tool for Splitting or Deleting Part of a Prune
If you lot want to split a video or audio clip in ii, or remove a segment in the middle of a clip (such every bit eliminating a sound gap in your audio), you can use the Razor tool to split up or slice out a segment of the clip.
The razor tools is platonic for editing longer clips, like interview segments. You tin can bring the entire prune into the timeline and utilise the razor tool to make cuts to the clip.
 Information technology'south chosen a razor considering in the traditional movie editing process a record was literally sliced with a razor blade to remove unwanted pieces of the moving-picture show or rearrange segments of a picture show.
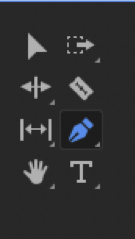
To do these cuts in Premiere Pro 2022, in the Tool palette click on the Razor tool, which looks similar a razor blade. For a shortcut, you can besides printing C on your keyboard. Your cursor will alter to a modest razor icon while you are using this tool.
Click on the video prune at the point where y'all want to cut it. Or cutting the clip multiple times to create a segment in the middle that you tin remove. Then click on the Selection tool in the tool palette (the keyboard shortcut is the Five key) so you can select 1 of the segments to move or delete information technology. Delete the selection y'all've fabricated by clicking it and pressing Delete on your keyboard.
Editing Clips in the Source Pane
You can make shorter selections from video clips while they are displayed in the Source pane to simplify editing before you bring clips into the timeline. You tin select only the all-time parts of the clip to bring into the timeline, then you tin can edit out whatever unnecessary footage.
In the Project pane, double click on the clip y'all want to edit to display it in the Source pane.
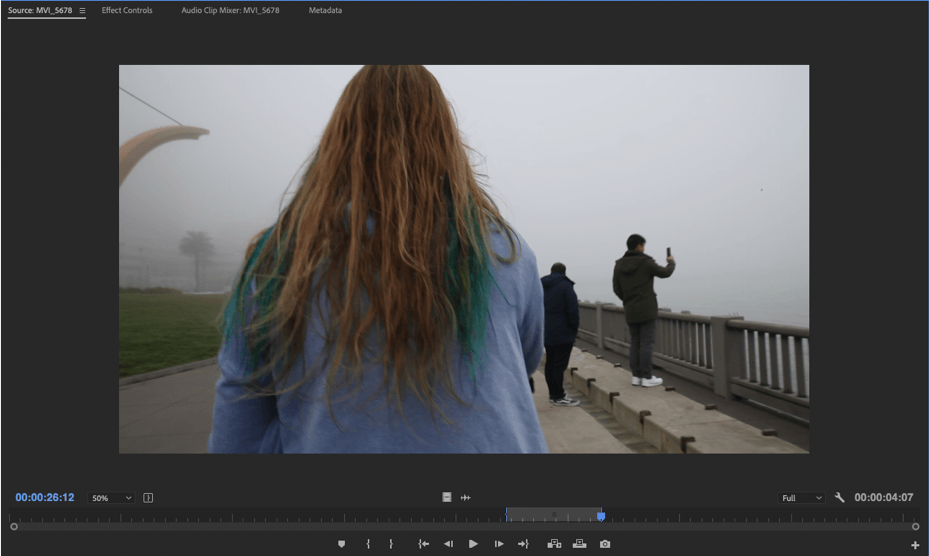
Play the prune using the play controls at the bottom of the Source pane, or by pressing the spacebar on your keyboard (printing the spacebar once to play and then again to intermission the clip).

You too can use J, K, Fifty, and the spacebar on your keyboard to play the clip – Fifty to speed up, J to rewind, One thousand to pause, and the spacebar to play the clip at normal speed and pause.
You tin also scrub through a prune past clicking on the blue playhead just under the clip and dragging it to the right or left.
Select the part of the prune yous want to motility to the timeline by setting in and out points on the clip while information technology's in the Source pane. Move the playhead to the point where you lot want your clip to start, and press I on your keyboard, or clicking the { left bracket button, to prepare the in signal. At the betoken where you want your prune to end, printing O on your keyboard, or click the } right bracket button, to prepare the out point. You volition see a highlighted blue surface area in the scrubber bar below the prune showing the selected area.
The in and out points can be adapted by clicking and dragging on either edge of the blue section of the scrub bar.
In one case you've set the section of the clip yous want in the In and Out points, you're ready to copy the clip to the Timeline.
Overwrite and Insert Edits
If you desire to put a new clip at a point in the timeline where information technology will overlap with an existing clip, you have 2 options:
- Overwrite Edit : the portion of the new clip that overlaps the old clip volition supercede the contents of the quondam clip. Thus you might accept part of a video interview with someone that you want to overwrite with some "b-roll" footage of what the person is talking nigh.
- Insert Edit : the quondam clip will exist split up at the insertion bespeak for the new clip and part of the old prune volition be moved to the right on the Timeline to make room for the new clip. You lot might want to dissever up a video clip of a scene past inserting a new scene in the middle of it.
Y'all can do Overwrite or Insert edits past moving a new clip to the same track in the Timeline as the existing clip or by putting the new prune on a new video rails higher up the existing prune.
If you practise an Insert edit on a new track, it volition still split the original prune on the track below. If you exercise an Overwrite edit on a new runway, information technology will not change the original prune on the rails below, but you lot won't meet that video because the new video is on a track above it.
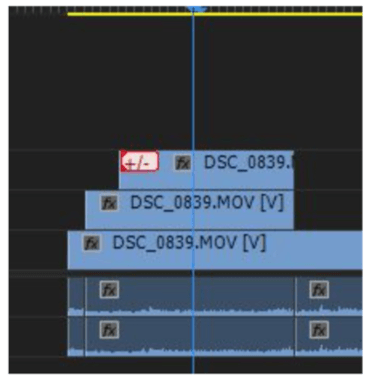
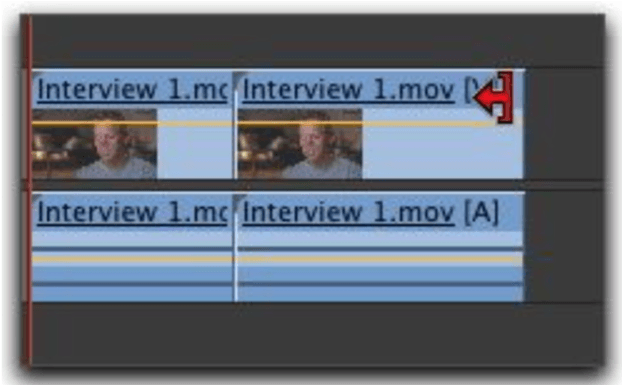
The Overwrite edit is the default in Premiere Pro 2022. When you elevate a prune to the timeline, Premiere will automatically overwrite the overlapping portion of the existing prune with the new prune. This will be indicated by an arrow pointing downward.
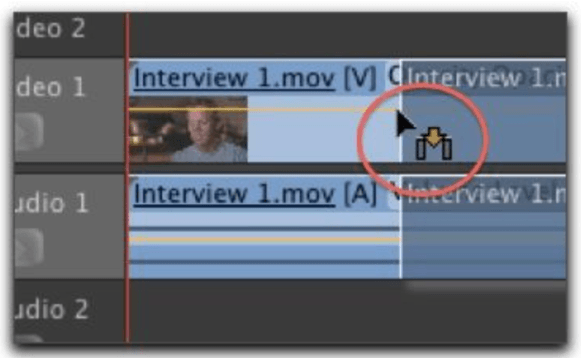
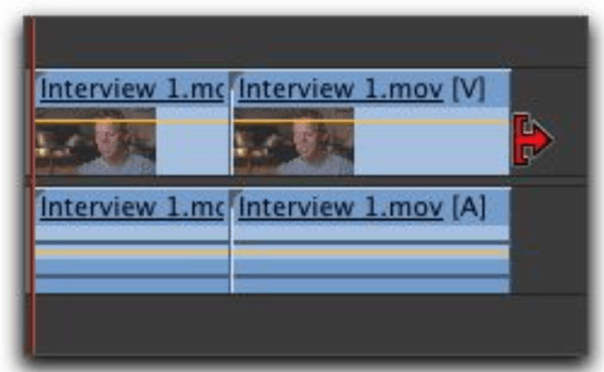
To do an Insert edit , printing and concur down the Command key on the Mac keyboard and and so click and elevate the clip to the timeline. That will split the existing prune on the Timeline and motility the remainder of the clip further to the right on the timeline to make room for the new clip. This is indicated by an arrow pointing to the right.

In the Project pane, click to highlight the video clip you want to insert into the timeline. Below are the buttons for Insert and Overwrite . They also have keyboard shortcuts: , and .

If you use the keyboard shortcuts or the buttons, Premiere Pro 2022 will place the clip where your playhead (the vertical blue line) is located in your timeline.
Track Targeting
You can command where clips become when yous add them from the source monitor, or when you lot copy and paste them.
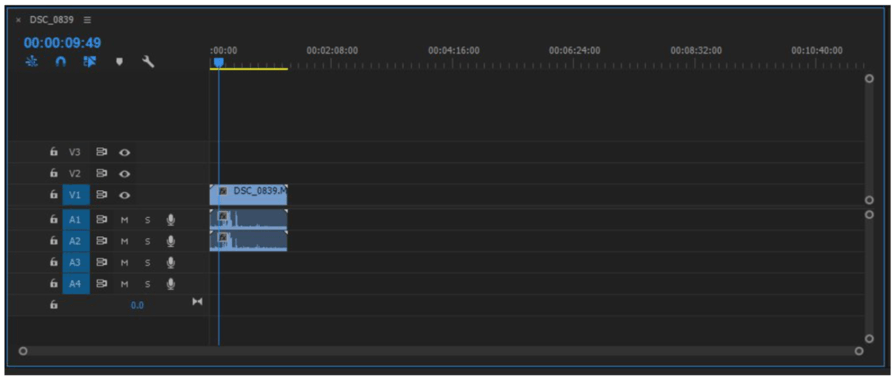
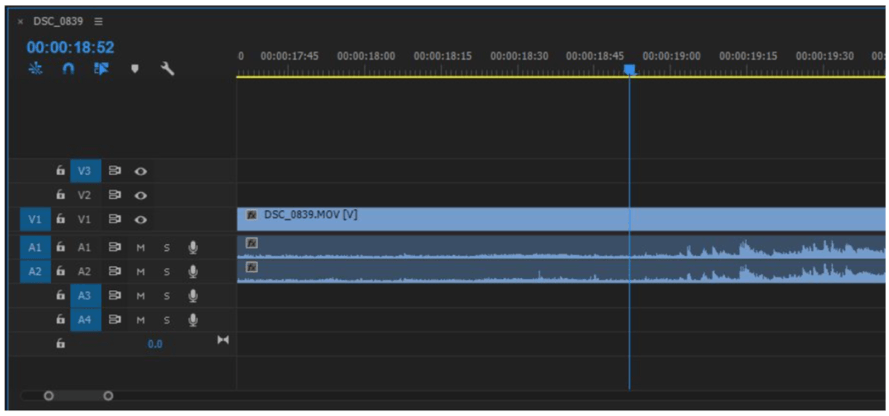
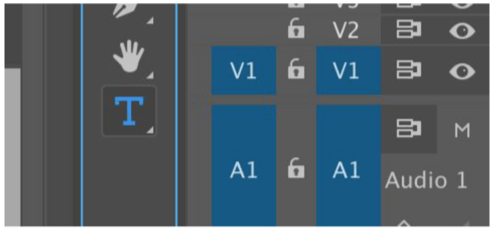
The rows with blue highlighted messages, to the left side of the Timeline pane, control where video clips are placed. The far left side refers to what is in your source window. It'south chosen source targeting.
The beneath prototype is maxim I have a clip loaded that has one video track and 2 sound tracks, and that if I drag information technology into the timeline, it would exist placed on video track V1 and audio tracks A1 and A2. Y'all tin move these targets around to modify where clips will be placed.
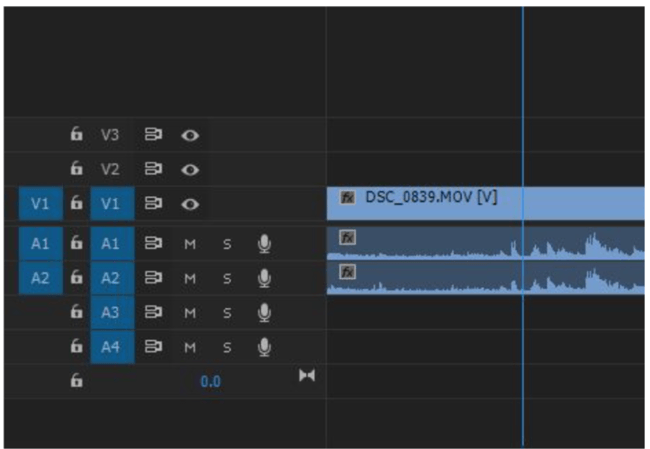
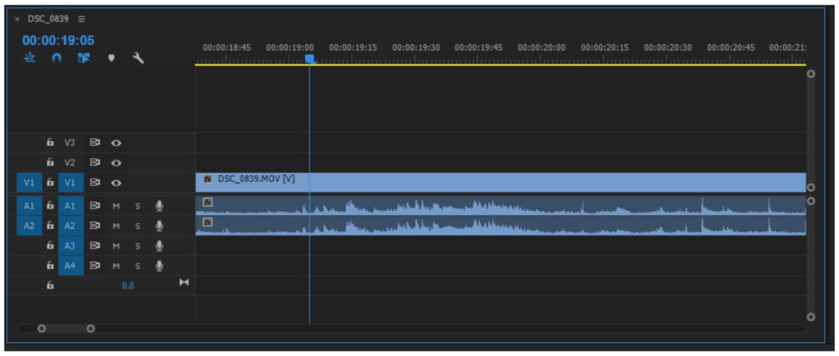
In the beneath image you can come across that the source targeting has been moved to video rails V3 and audio tracks A3 and A4. When clips are added from the source window, this is where they will exist placed.
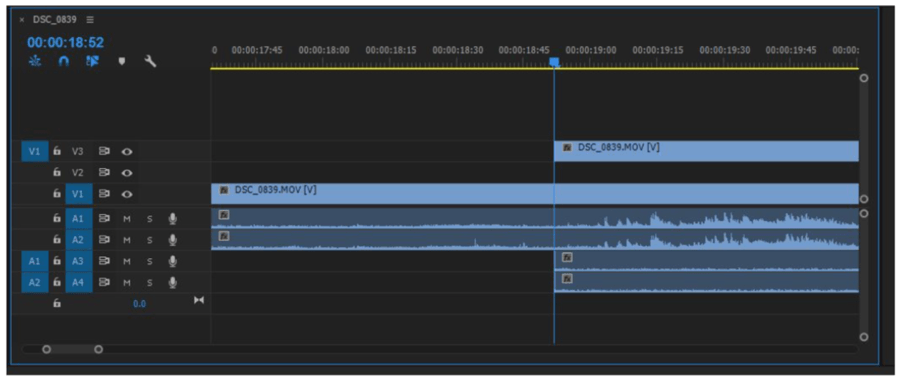
The right column of highlighted boxes is besides "targeting," only specifically for when you copy and paste clips. This is called Track Targeting. Then if you copy a clip, by default it volition paste into video track V1, but you could change that past clicking the highlighted video and audio tracks to plow targeting on or off.
By default, clips will paste into the innermost targeted track. Then right now, if I copied and pasted a clip, it would appear in video rail V3 and audio tracks A3 and A4.
Working with Multiple Tracks
By default, Premiere Pro 2022 provides three tracks of video and vi tracks of sound in the timeline. You can create additional tracks past dragging clips above or below the outermost tracks.
You can also create additional tracks in the horizontal menu at the top of the screen. Click Sequence > Add Tracks.
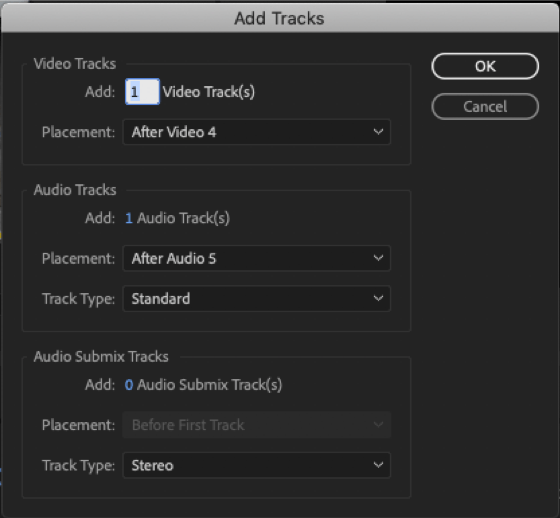
A new window will appear called Add Tracks . Enter the number of video and audio tracks you would like to add, and choose where they will exist placed. Click OK to add the tracks.
If you have multiple tracks of video, whatever video is on the top runway in the timeline will be shown when the sequence is played, and whatsoever other video clips underneath will not be seen.
If you have multiple audio tracks so all the sound will play simultaneously no matter which is above or below the others on the timeline.
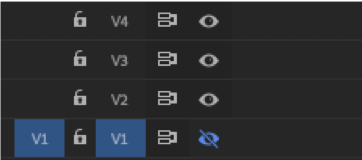
To hide the video from a item track in the timeline:
- Plough off the video for a item rail in the timeline past clicking on the eye icon push to the far left of the runway to hide it. The centre icon is labeled Toggle Track Output, when you hover over information technology. After clicking the eye icon, information technology will be highlighted blue with a cross through information technology. Click information technology again to view the footage on the track.
To turn off audio for a particular track in the timeline:
- Plow off the sound for a particular track in the timeline past clicking on the M button to the far left of the track. The push button will plow greenish when the track is muted.
- To only play the sound from one specific rails, click the S icon (for Solo). The button volition plough xanthous when the rails is "Soloed."

Markers
Yous tin can prepare markers on clips in the Source, Timeline or Programme panes to assistance keep track of clips when editing video and audio.
The marker creates a snap-betoken on a prune or the timeline that the playhead will lock onto.
This can be helpful when you're editing audio and you desire a video rail to begin on the downbeat of a song. You can ready a mark during audio editing at the downbeat so you so tin position a video prune to begin at precisely that point.
You lot create a marking in a prune in the Source, Timeline or Sequence panes by moving the playhead to the desired point on the prune and pressing the Chiliad primal . The marker will appear as a tiny green icon but above the playhead.
To delete a marker right click on it and select Clear Selected Marker in the drop-down menu.
When using multiple markers, it tin be helpful to change the color of a marker and give it a name. To edit, right click on the selected marker, and choose Edit Marker… from the dropdown bill of fare. You tin can change the name and color of the marker in the window that opens, and click OK .
Audio
Audio tracks, both those associated with your video or independent tracks that are just sound, are displayed below the video tracks on your timeline.
Adjusting Volume for an Private Clip
To arrange the audio levels for a rail, commencement click and drag on the edge of the runway to aggrandize it, or click Option/Alt + = until a line appears in the middle of the track.
The waveform is a visual representation of your audio that shows information technology'due south loftier and low points. In Premiere, there is a horizontal line through the waveform that represents the base sound level. Y'all can elevate this line upward or down to conform the volume of the clip. You can't boost the sound level very much, but you can reduce it to negative infinity (which essentially mutes it).
Adjusting Volume at Multiple Points in a Clip
You also can raise or lower the audio at multiple points within a prune to create fade ins and fade outs with your sound.
You tin can create keyframes by holding down the Command central on the Mac keyboard while clicking on the white audio level line with your cursor. Do this at the points where y'all want the audio to change.

Another way to do add keyframes is by selecting the Pen from the tool palette, and clicking on the white line.
When y'all move your cursor over a keyframe you'll notice a little diamond icon appear to the lower correct of the cursor. This indicates yous tin change the audio level by clicking, property downwards your mouse and dragging the keyframe college to increase the sound or lower to subtract audio.
The audio level line volition change accordingly. If the sound level line slopes up from ane keyframe to the next, the audio will fade in. If the sound level line slopes down from ane keyframe to the next, the audio volition fade out.
You also can drag a keyframe to the left or right to adjust where fade ins and fade outs begin and terminate.
To delete a keyframe, select it and press Delete on your keyboard.
Transitions
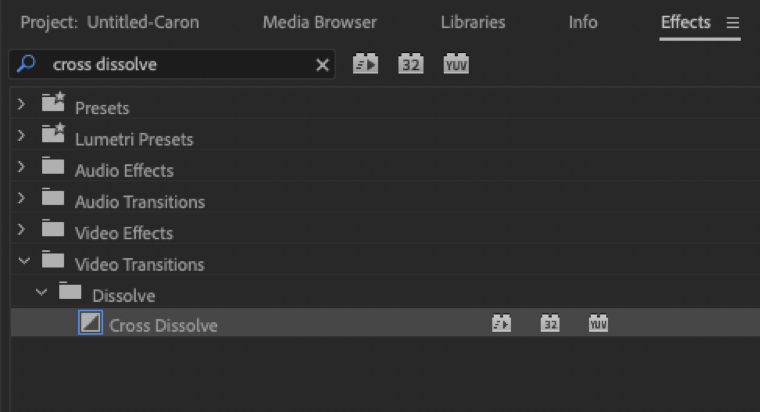
To add a transition between clips, like a cantankerous dissolve (so the kickoff clip gradually fades out as a second prune fades in) go to the Effects tab inside the Projection pane. Open up the Video Transitions folder to access a set of folders with a number of different transitions you can use.
One of the near unremarkably used transitions is the cantankerous deliquesce. Open the Dissolve folder and you'll see the Cross Dissolve transition listed there. You lot can as well apply the search bar to locate a specific transition you want to use.
To add together the transition between two clips in your timeline, position your playhead between the clips, and so select the transition you want to use. Click and drag the transition from the folder to the timeline, and release it when it's positioned betwixt the two clips.
The transition is shown as a gray bar connecting the clips.
 A faster style to add together a cantankerous dissolve between two clips is to utilize a keyboard shortcut. Click the edit point betwixt the 2 clips and so it is highlighted crimson, and then press Shift + D fundamental on your keyboard. The Cross Dissolve transition will be added here, too as Abiding Power, which fades in and out audio between clips. You can remove any of these elements past clicking the gray bar and pressing Delete on your keyboard.
For the same effect, you tin as well right click, and select Apply Default Transitions. Premiere'southward default transition is Cross Dissolve.
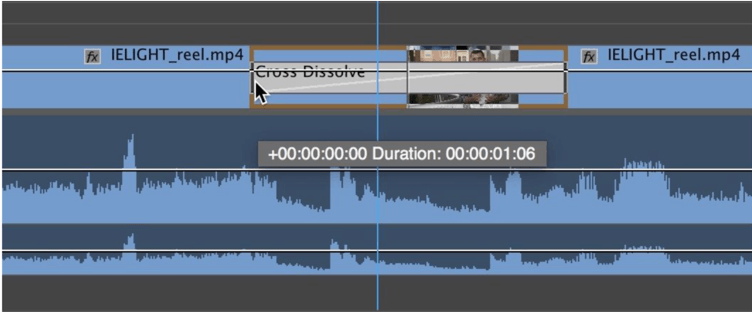
Past default transitions are i 2nd long. If you want to change the duration or move the transition slightly to the left or right, first zoom in on the timeline by pressing + on your keyboard .
Once zoomed in, you tin click on the edge of the transition and drag to extend or shorten the transition. You tin can hold the Shift key to motion one edge of the transition at a fourth dimension.
Titles and Text
Yous can add titles and text to your sequence, such every bit a box with explanatory text or a "lower tertiary" toward the bottom of a clip to identify the person in the video.
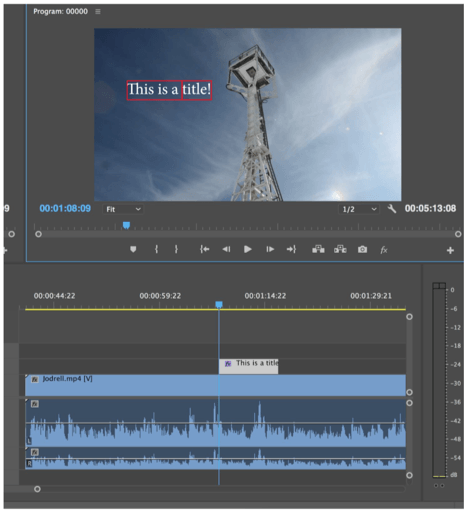
Showtime, position your playhead over the approximate area in your Timeline sequence where yous want the title to starting time.
Select the Text tool from the toolbar (shortcut T ).
With the text tool selected, y'all tin can drag and describe a text box in the Program window (upper right) and start typing. The championship will appear as a clip in the timeline, which you can extend or move merely like video footage.
Yous tin can switch back to the pointer tool (shortcut V ) to motility the title around the image, or motility it on the timeline. Double click the text box to switch back to the text tool to edit the contents.
To edit the titles in-depth, open the Effect Controls tab in the Source pane (superlative left). Hither you can conform font, size, mode, etc.

To change the color of the text, click on the colored square chosen Fill. The text color is set to white by default.
A championship clip can contain multiple pieces of text. With the championship selected in the timeline, yous can use the Type key to make new text boxes.
You tin can add together shapes to a championship by clicking and holding on the Pen tool and selecting one of the shape tools.
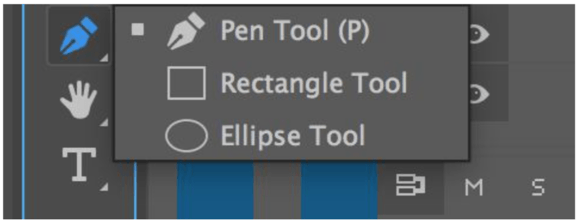
You tin and so use the shape tools (rectangle, ellipse, or pen) to create shapes in your movement graphics clip. Merely similar text, shapes can likewise be edited in the motility graphics window, under Effect Controls.

If you want to use the title yous've created in other Premiere Pro 2022 projects, right click on the title in the timeline and select Consign As Movement Graphics Template…
Y'all can also create more complex templates in Adobe After Effects and import them into Premiere Pro 2022.
Effect Controls
There are many other tools y'all can utilize within Effect Controls. Some of the most commonly used furnishings are under the Video Effects subsection. You tin add move to whatever graphics, or directly to your video footage. This is most often used to adjust the Position and Calibration of your video.
Adjust the Scale of your prototype (to zoom in or out) with the Scale slider. Expand the carrot to the left of Scale, and slide the circle that appears below, forth the line to the left or correct. This will zoom your paradigm in or out.
Once you've adjusted for scale, y'all'll desire to reposition your image. Located straight above Calibration in the Video Effects tab, you can change the number values to move your video to the left or right of the screen. Hover your cursor over the number in the left column to move the image to the left or right. You tin can hover your cursor over the number in the right column to move the image up or down.

Color Correction
For basic color correction, search for Fast Color Corrector in the Furnishings search bar located to the right of your workspace. If the Furnishings search bar is not visible, select Furnishings from the vertical bar at the peak of your workspace.
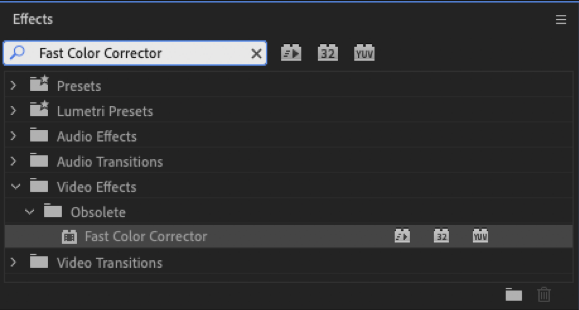
Once Fast Color Corrector is revealed, elevate and identify it on top of the video footage yous want to change. The Effect Controls window will open up in the superlative left Source window in your workspace. A large multi-colored circle will appear, where you tin begin editing your color.
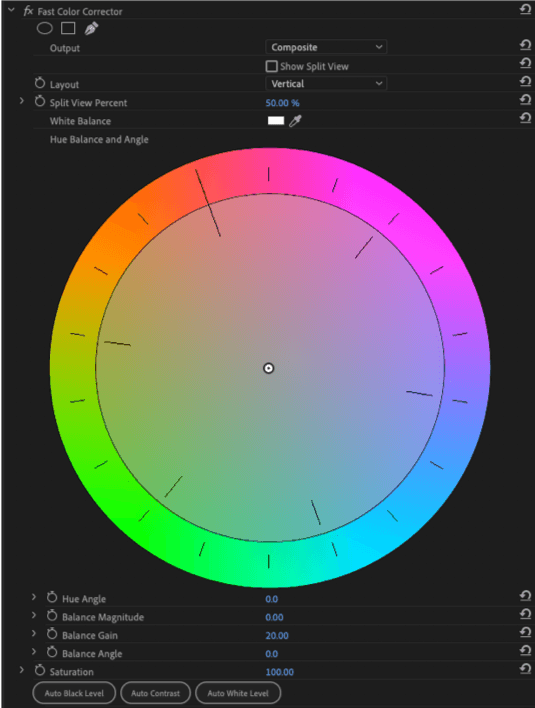
Ane of the most commonly needed colour adjustments is White Balance. Select the dropper tool next to the white box labeled White Balance, and click on the whitest surface area in your video located in the top right box of your workspace. Use your best sentence and adjust as necessary to reach the ideal colour for your video.
Rendering
When yous add an effect like a transition or a title to your sequence, it may need to be rendered so it displays properly on your computer screen.
Rendering means having the effect candy past the computer then it is permanently added to your sequence of clips. If you see cerise or yellowish lines above your Timeline, those are areas of your sequence that need to be rendered, usually because you have added effects there.
Rendering your video as you're editing can help with whatever playback problems yous might be experiencing.
To return all the furnishings in your unabridged sequence, in the horizontal menu at the elevation select of the screen Sequence > Render Entire Piece of work Area . A window will open, showing the rendering progress, and your sequence will play automatically one time rendering is complete.
The work expanse is the gray bar with the blue end points that sits in a higher place all the tracks in your sequence. You can reposition the work area, and hence the portion of your sequence being rendered, by dragging the blue end points to the left or right.
It volition have some time for the rendering to be completed depending on how complex the furnishings were that you added to your sequence.
Transferring Projects
When working in a collaborative state of affairs, you tin can transfer an entire Premiere Pro CC 2022 project from i team member to another.
This would allow one person to work on a rough cut of a sequence, and and so transfer the project to a 2nd person to do the final edits.
Alternatively, 1 person could work on the beginning of a sequence, another person could work on the terminate of a sequence, and then they could be merged into a single sequence.
To transfer a project, inorth the card at the top of the screen, select File > Project Manager .
In the dialog box that appears make these selections:
ane) Select the checkbox next to the sequences you want to share.
2) Nether Resulting Project, select the option Collect Files and Copy to New Location .
3) Under Options, select the the checkbox for Exclude Unused Clips (optional but recommended).
Note: Choosing this option will just transfer the clips that are in a sequence, and any picture file or clip that you lot have non used volition not be transferred. This is recommended to reduce the overall file size of the project you lot are sharing. If y'all want to include every clip that y'all have imported into you projection folder, and so uncheck this box and everything will be transferred.
4) Check the 3 boxes labeled Include Preview Files , Include Audio Conform Files, and Rename Media Files to Lucifer Clip Names.
5) Under Destination Path, click the Scan button to cull a destination to which this projection and all its files will exist copied. In about situations information technology will be an external hard drive of the person with whom you are sharing the project.
And so click OK to complete the transfer of the project and its files.
The person receiving the files must so connect the external drive to their computer and open the projection. All the relevant media files volition be in that new projection.
If two people want to merge two sequences into one (like the beginning one-half of a sequence and the end), the person receiving the files again must connect the external drive to their figurer. They so must open up their existing project, select File > Import , navigate to the projection they transferred from the other team member, and click Import . In the dialog box bank check Import Selected Sequences .
A folder will announced in your Projection pane with the proper name of the project you lot imported. Open that folder, click on the sequence inside, and re-create the clips into the timeline.
Finally, open the sequence in the existing project and copy the clips from the imported sequence into the timeline.
Exporting
Before exporting, kickoff you lot'll want to select the part of your timeline that yous desire to plow into a finished video. You can select this area by marking an In and Out signal in the timeline the same manner you lot would in the source monitor (with the buttons on the toolbar, or with the I and O keys).
To export a sequence in Premiere Pro 2022 for viewing on the spider web, in the menu at the top click on File > Export > Media .
That volition bring upwards an Consign Settings box where you tin can select what in your sequence y'all want to export and to adjust the settings for your exported movie, similar the Format and Preset settings.
Offset review the Source Range pick in the lower left to brand sure y'all're exporting all of the sequence that y'all want. Make sure it is prepare to Entire Sequence to consign everything on your timeline.

Be sure to check that you lot didn't get out any leftover clips on the stop of your timeline that you don't want included in your motion picture.
Nosotros recommend item settings for exporting a video you can upload to YouTube and and so embed on a web folio:
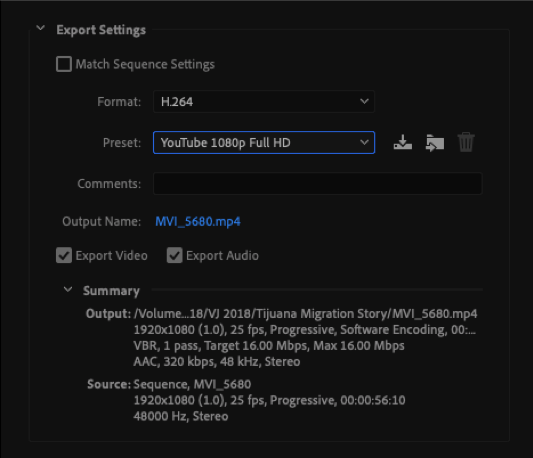
Under Export Settings, click on the Format drib-down card and select H.264.
Click on the Preset driblet-downwards menu and select YouTube HD 1080p Full HD.
For maximum quality, under Bitrate Settings, select VBR ii Laissez passer and set up the Maximum Bitrate to around twice the Target Bitrate. Annotation: VBR 2 will double your export fourth dimension, but will improve quality.
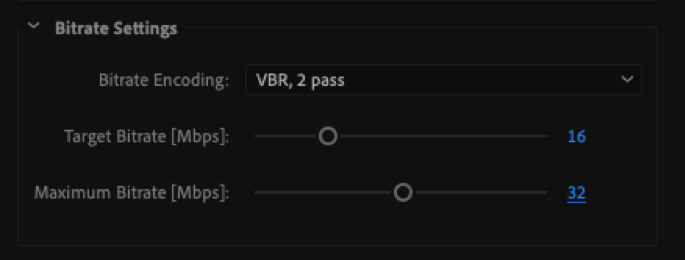
Target Bitrate is the setting that has the biggest issue on both file size and quality. For general settings, 10 is good for social media, 16 is recommended for YouTube, just if you lot've shot on a skillful camera and you desire maximum quality, use 25. Higher than that you probably won't notice the difference.
If you are having trouble with the your videos colour looking different afterwards exporting, try checking the "render at maximum depth" box, just otherwise leave the residuum of the settings alone.
Under Export Settings, click the blue highlighted file name located adjacent to Output Proper name, to rename your video file and select a destination folder on your computer where the video file will be exported (such equally to an exports folder on your estimator).
Click the Export push button at the bottom right.
Key Differences between Premiere Pro 2022 and 2022
If yous've updated to Premiere Pro 14.0 or Creative Cloud 2022, you may be wondering about the changes made between the updated version and the 2022 version. A brief caption of key differences as described by freelance video editor, Piotr Toczyński, What'south New in Premiere Pro 2022?
About this Tutorial
This tutorial was written for the Berkeley Advanced Media Establish by faculty and staff at the UC Berkeley Graduate School of Journalism.
Republishing Policy
This content may non be republished in print or digital grade without express written permission from Berkeley Avant-garde Media Institute. Please see our Content Redistribution Policy at multimedia.journalism.berkeley.edu/content_redistribution/.
© 2022 The Regents of the University of California

How To Copy And Paste Color Settings In Premiere,
Source: https://multimedia.journalism.berkeley.edu/tutorials/adobe-premiere-pro/
Posted by: huntsmanbire1992.blogspot.com
0 Response to "How To Copy And Paste Color Settings In Premiere"
Post a Comment