

How Do I Download Pictures From My Iphone To My Pc

Apple iPhone is withal one of the best smartphones out in that location that tin take beautiful pictures. iPhone users tend to proceed a backup of these photos for future purposes. Every bit to the methods, most iPhone users will turn to iTunes which tin sync iPhone data to PC. Simply as we all know, iTunes is saying bye now. Therefore, many iPhone users are wondering if there is a elementary way to transfer photos from iPhone to Windows x without the need for iTunes. This commodity will bear witness you three practical methods to practise this.

Three methods to transfer iPhone photos to Windows x
- Using Windows 10'south new function – Photos app
- Using wireless transfer tool – AirMore
- Using Windows 10 File Explorer
Method i: Windows 10 Photos app
Microsoft adds the Photos app function to its newest OS which tin can help you copy photos from iPhone to Windows ten in bulk. Information technology's very interesting. You may have a try.
Step ane: Plug your iPhone into your PC over the USB cable.
Step 2: Open Photos app. This can exist found by typing "Photos" into the search bar at the lower left corner of the screen in Windows ten.
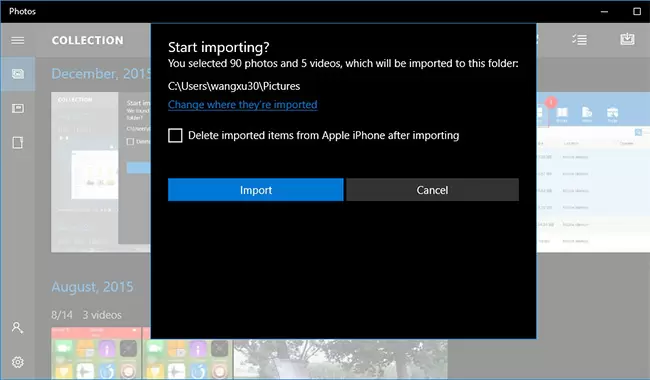
Step 3: Click the button at the top-correct of the Photos app to import. You can click the 3 dots to get the text reminder.

Step 4: Select your iPhone from the options that appear and tap "Import" to import photos from iPhone to Windows 10.
Pros:
- Transfer photos in bulk.
Cons:
- Information technology can't practice this without USB cablevision.
- Information technology's non precise.
- It'southward non able to load all photos of iPhone and consign photos from PC to iPhone.
Now permit'south see another method through which yous transfer photos betwixt iPhone and Windows 10 with ease.
Method 2: AirMore – transfer photos from iPhone to Windows 10 wirelessly
AirMore is a powerful mobile devices direction tool based on spider web. It has been favored by most of iPhone users for its useful function in transferring photos between iPhone and Windows PC or Apple Mac. It only takes you lot seconds to copy photos from iPhone to Windows ten without using iTunes and any USB cablevision. Now get started with steps below.
Stride 1: Download this app from Apple tree Store and install it on your iPhone or you tin can directly download information technology by hitting the download button beneath.
Pace ii: Connect iPhone with AirMore.
- Open AirMore on iPhone. Browse the QR code or striking your device proper name in Radar on the AirMore web. Y'all can go to the AirMore spider web page by visiting "spider web.airmore.com" through Google Chrome, Firefox and Safari.

- If yous connect 2 devices in Radar, and so click "Accept" button when a notification box pops up on your handset in order to confirm your understanding on iPhone's connection with this app.

Tips: To get a successful connection, please set your iPhone and PC in the same Wi-Fi.
Footstep 3: How to transfer photos from iPhone to Windows x
- Cull "Pictures" icon on the app interface of PC, from which you can move photos from iPhone to Windows 10.
- Tick photos you want and and then hitting on "Export" button. Within seconds, these photos will be copied to your PC if your network's pretty smooth.

Pros:
- Without using iTunes and USB cable.
- Import/Consign function.
- 100% gratis.
Cons:
- It relies on shine network.
Sometimes your PC and iPhone'south network might be non stable. In this instance, you may try the third method.
Method iii: Windows 10 File Explorer
File Explorer is a built-in role of Windows PC with which yous can view and manage files in your devices and drives. Every bit to this function, Windows 10 has a more than outstanding performance than Windows viii and Windows vii. Let'southward see how it works.
Step 1: Connect your iPhone to your Windows 10 PC using the USB cable provided by Apple. Check your iPhone screen at present and a notification with "Trust" option will appear. Choose "Trust" pick to keep.
Step two: Open Windows File Explorer. You can press the Kickoff key on your keyboard and you'll see the "File Explorer" icon on the left pane.
Stride 3: Under "This PC", you should run across your iPhone as a drive. Double-click the icon for your iPhone here. Y'all will also need to open "Internal Storage" > "DCIM", then some other folder within to get access to your photos.
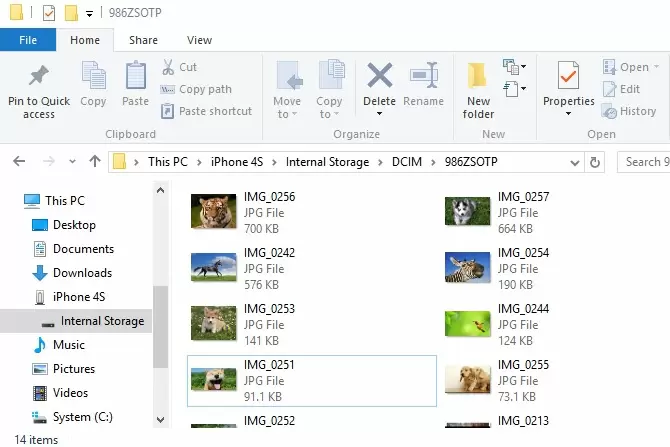
Step iv: Photos and videos taken on your iPhone should at present exist visible. Then you can select the photos to transfer them to Windows 10.
Pros:
- No additional apps needed.
- Easy to achieve.
Cons:
- It relies on USB cablevision.
- It fails to read all photos of iPhone.
Conclusion
Equally we can see, all methods mentioned above allows y'all to transfer photos from iPhone to Windows x PC. Nevertheless, taking all aspects into considered, AirMore will be your all-time choice. Because AirMore enables users to wirelessly transfer photos and other files betwixt iPhone and PC. In add-on, using AirMore, you can easily add files or delete unnecessary files in but one click. All in all, with this smart tool, you can manage nearly all your iPhone data with very ease.

Source: https://airmore.com/iphone-photos-to-windows-10.html
Posted by: huntsmanbire1992.blogspot.com
0 Response to "How Do I Download Pictures From My Iphone To My Pc"
Post a Comment